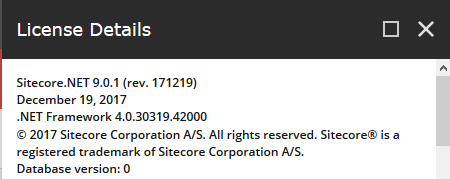
Sitecore 9.0 Update – 1 has been launched recently. I got a chance to install it. During my insallation, I listed down the steps which I performed.
PREREQUISITES:
- Windows 10
- MS SQL Server 2017
- MS SQL Management Studio
- .Net Framework 4.6.2 or later
- Web Deploy 3.6
- SOLR 6.6.2
- Java Runtime Environement
- NSSM
- Sitecore 9.0 Update -1
- Sitecore License file
Step – 1:
- Install Windows – 10 on your machine
- Enable IIS using Turn Windows Feature on
- Install Web Deploy 3.6
- Install Java Runtime Environement(64 bit)
- Set JAVA_HOME
Step – 3:
- Create a new folder D:\SC91_INSTALL
Step – 4:
- Download SOLR 6.6.2
- Copy and past it to D:\SC91_INSTALL and unzip it
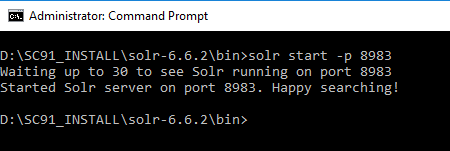
- Open command prompt in administrator mode and run solr start -p 8983 as per given in the screenshot

- Open browser and navigate to http://localhost:8983/solr
Step – 5:
- Install NSSM
- Copy and paste nssm-224.zip to D:\SC91_INSTALL
- Unzip NSSM
- Open command promort in administrator mode
- Go to D:\SC91_INSTALL\nssm-2.24\win64\
- Execute command :
nssm install Solr_6.6.2
A popup will come. Provide below informations:
Path: D:\SC91_INSTALL\solr-6.6.2\bin\solr.cmd
Arguments: start -f -p 8983
Click on Install Service
- You will get the success message.
- Run windows services Solr_6.6.2

Step – 6:
Host Solr service on secure (HTTPS)
- Download solrssl.ps1 and copy it to D:\SC91_INSTALL
- Execute command:
Set-ExecutionPolicy Unrestricted - Go to D:\SC91_INSTALL
- Run the downloaded script (.\solrssl)
- It would aks the keytool path so provide it C:\Program Files\Java\jre1.8.0_161\bin\keytool.exe
You will find it where you have install Java runtime. - It will generate two files at D:\SC91_INSTALL (solr-ssl.keystore.jks and solr-ssl.keystore.p12)
- Copy these files to D:\SC91_INSTALL\solr-6.6.2\server\etc
- Open D:\SC91_INSTALL\solr-6.6.2\bin\solr.in.cmd in notepad and append the below lines at the end:
set SOLR_SSL_KEY_STORE=etc/solr-ssl.keystore.jks
set SOLR_SSL_KEY_STORE_PASSWORD=secret
set SOLR_SSL_KEY_STORE_TYPE=JKS
set SOLR_SSL_TRUST_STORE=etc/solr-ssl.keystore.jks
set SOLR_SSL_TRUST_STORE_PASSWORD=secret
set SOLR_SSL_TRUST_STORE_TYPE=JKS
set SOLR_SSL_NEED_CLIENT_AUTH=false
set SOLR_SSL_WANT_CLIENT_AUTH=false - Restart Solr_6.6.2 service
- This time open solr using secure URL (https://localhost:8983/solr)
Step – 7:
Enable contained Database Authentication
- Launch MS SQL Server Management Studio and login as an administrtor
- Run the below following query:
sp_configure ‘contained database authentication’, 1;
GO
RECONFIGURE;
GO
Step – 8:
Keep your Sitecore community credentials ready. You will have to login to download Sitecore 9.0 Update -1. This is available only for the Sitecore Certified Professional.
- Download and unzip package for XP single
- Copy and paste the following zip files to D:\\SC91_INSTALL
Sitecore 9.0.1 rev. 171219 (OnPrem)_single.scwdp.zip
Sitecore 9.0.1 rev. 171219 (OnPrem)_xp0xconnect.scwdp.zip - Unzip XP0 Configuration files 9.0.1 rev. 171219 and copy and paste all the files to D:\SC91_INSTALL
sitecore-solr.json
sitecore-XP0.json
xconnect-createcert.json
xconnect-solr.json
xconnect-xp0.json
Step – 9:
Put your Sitecore license file at D:\SC91_INSTALL
- Download sc9_install.ps1 and move it to D:\SC91_INSTALL
- Open this file in notepad and made the following changes:
$prefix = "SC91"
$PSScriptRoot="D:\SC91_INSTALL"
$XConnectCollectionService = "$prefix.xconnect"
$sitecoreSiteName = "$prefix.sc"
$SolrUrl = "https://localhost:8983/solr"
$SolrRoot = "D:\SC91_INSTALL\solr-6.6.2"
$SolrService = "Solr_6.6.2"
$SqlServer = "Machinename\InstanceName"
$SqlAdminUser = "sa"
$SqlAdminPassword="sa_password"
Step – 10:
- Open Windows Powershell in administrator mode
- Execute the below command on Powershell
- Execute the script sc9_install

Register-PSRepository -Name SitecoreGallery -SourceLocation https://sitecore.myget.org/F/sc-powershell/api/v2
Install-Module SitecoreInstallFramework
Install-Module SitecoreFundamentals
Now your installation is completed 🙂 You can browse your website.
Step – 11:
After installing Sitecore, must rebuild the search indexes, and the Link databases.
To rebuild all the indexes:
- On the Sitecore Launchpad, click Control Panel, and in the Indexing section, click Indexing manager.
- In the Indexing Manager dialog box, click Select all, and then click Rebuild.
To rebuild the Link databases for the Master and Core databases:
- On the Sitecore Launchpad, click Control Panel, and in the Database section, click Rebuild Link Databases.
- Select the Master and Core databases and then click Rebuild.
Now you are all set.
That's all.
Thanks for your time and good day ahead.
SITECORE CLI LOGIN ERROR - /.well-known/openid-configuration: Bad Gateway
WALKTHROUGH OF ASP.NET RENDERING SDK
SETTING UP ASP.NET RENDERING SDK
DISABLE SITECORE PUBLISHING SERVICE
SETUP SITECORE PUBLISHING SERVICE
SITECORE CONNECT CONNECTOR - CONTENT HUB