Dynamic placeholder is a great functionality for the content author. It provides the functionality to add/change the layout at runtime without knowing much about Sitecore and technology. Content author can add/change component at any point of time at the given place. As a developer, you can create a page having header, footer and all must to have component on the page with the defined layout to keep your website look and feel consistent and provide the space where content author can put any available component. It can have any UI layout. Content author can open that page in the Experience Editor and put one or many components on the page.
This functionality is very helpful especially when you have a component and need to provide the space for any component available. Content author can put any of the available components somewhere on the existing component.
This functionality has been used since few years with non Sitecore JSS based application. The same can be used with the Sitecore JSS as well.
When you create a react application using following command, you get placeholder component automatically.
jss create < app_name > react
For the blog/demo purpose, I am creating two components, first will create placeholder on the page and second will put inside the placeholder.
Use below jss command to create components:
jss scaffold < componentName >
jss scaffold PlaceholderRnd
jss scaffold RndHeading
Change your PlaceholderRnd code as per given below:
As you can see the code, Placeholder component is being used to create placeholder. The name of the placeholder should be matched with the value given for name. Here we have component_container. Sitecore datasource fields can be access using rendering.fields.{fieldsName}. For the testing purpose, you can use the default code for component RndHeading.
From ReactJS prospective, we are done. We should deploy this code to Sitecore using following commands.
jss deploy app
Sitecore Changes
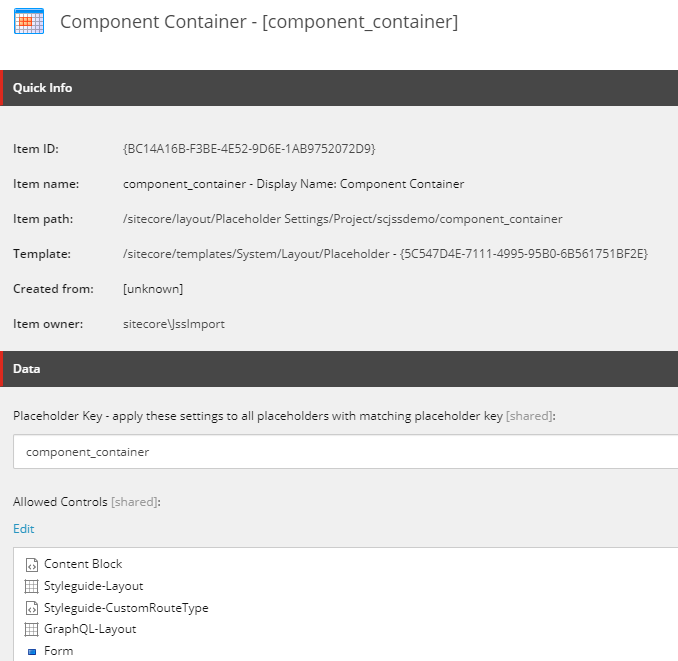
Earlier we have created a placeholder (in React JS) whose name was mentioned with the attribute name of the element Placeholder. So you should create a placeholder in the Sitecore whose placeholder key name should be matched.
You can either create a placeholder or make a duplicate of the existing one.
Now the next step is to tell the rendering that, that rending has a placeholder. So select the rendering inside the Sitecore which got created automatically after UI code deployment. You have created PlaceholderRnd component, so your rendering would be available with the same name at the /sitecore/layout/Renderings/Project/{SitecoreJSS_APP}/PlaceholderRnd
If you have not made any changes in the rendering so far, your rendering item would be in protected mode.
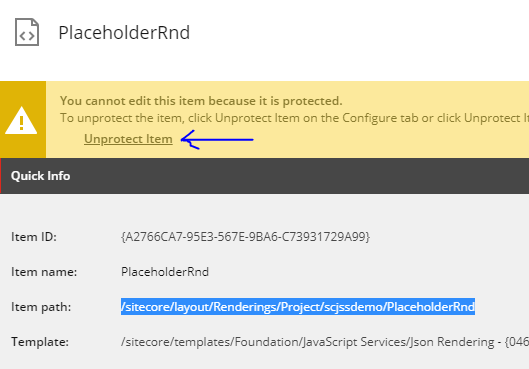
Click on the Unprotected Item link available just above the Quick Info to edit this rendering.
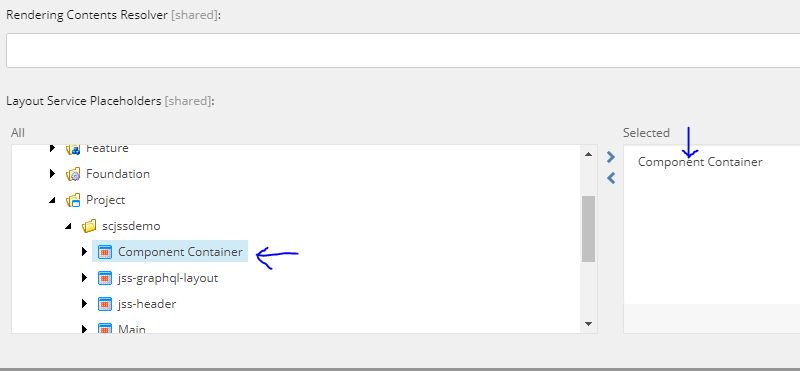
Go to the Layout Service Placeholders fields and select the newly created placeholder here.
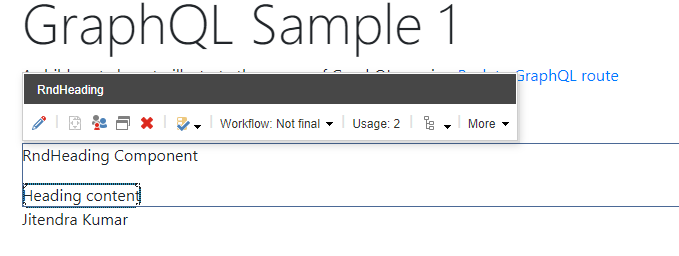
Now you are ready to use the dynamic placeholder on page. Open any of the existing or new page on the Experience Editor and add the newly created rendering PlaceholderRnd. It would look like the below:

As you can see in the screenshot, name of placeholder is component_container. Now you can click on the "Add here" button to add any of the component, in our case we have created RndHeading. So you can select this rendering and provide require datasource.
If you want to share/pass any object/props to the component that would be placed on the placeholder, you can use data attribute of the placeholder. You can pass any of the objects from this data attribute.
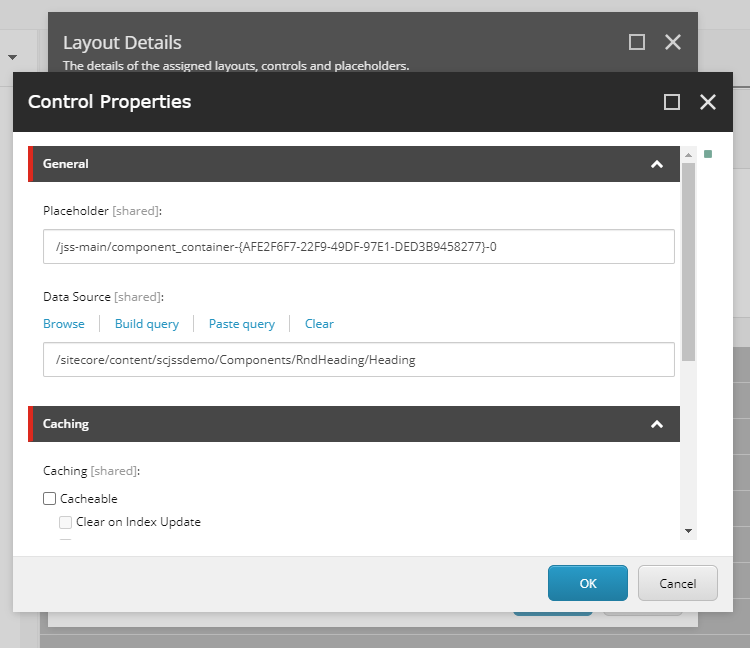
You can validate the dynamic placeholder name component_container in the placeholder of the RndHeading in the Control Properties (Presentation -> Details).
References:
SITECORE CLI LOGIN ERROR - /.well-known/openid-configuration: Bad Gateway
WALKTHROUGH OF ASP.NET RENDERING SDK
SETTING UP ASP.NET RENDERING SDK
DISABLE SITECORE PUBLISHING SERVICE
SETUP SITECORE PUBLISHING SERVICE
SITECORE CONNECT CONNECTOR - CONTENT HUB